Adding a Trusted Location in Microsoft Excel 2016 and later
Overview
BudgetLink has workbooks that require installing Ribbons and enabling Macros to work.
On the first run, you will be prompted to add a Trusted Location automatically. By adding a Trusted Location, you ensure that Excel identifies the files as Safe.
Select Yes to enable the files required by BudgetLink to run after they are added to Trusted Location.
BudgetLink installed on a Local System
- Start Microsoft Excel.
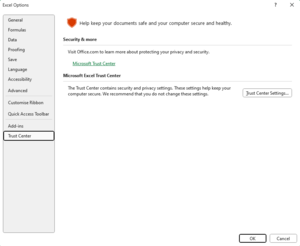
- Click on File > Options.
- Click on Trust Center tab on the left side panel.
- Click on the Trust Center Settings... button.
- A new Trust Center dialog box will open up.
- Click on the Trusted Locations entry in the list on the Trust Center dialog box.
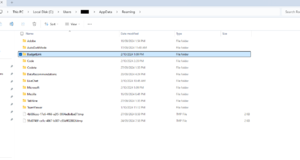
- In another file explorer window, enter "%APPDATA%" in the address bar without quotes
- An "Appdata Roaming" folder will be opened.
- Search and browse to BudgetLink folder. Copy the path to this folder.
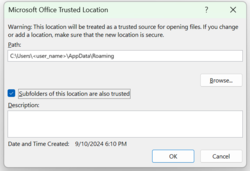
- Navigate back to Trust Center Dialog box and click Add New Location button.
- Paste the copied text in the Path input box and select the Subfolders of this location are also trusted checkbox.
- Click on the OK button of the Trust Center dialogue.
- Click on the OK button of the Excel Options dialogue.
- Close Microsoft Excel.
If BudgetLink is installed on a Network Location or Mapped Drive, the BudgetLink Ribbon will be stored in Local %APPDATA% folder which needs to be manually added to Trusted Location.
- Start Microsoft Excel.
- Click on File > Options.
- Click on Trust Center tab on the left side panel.
- Click on the Trust Center Settings... button.
- A new Trust Center dialog box will open up.
- Click on the Trusted Locations entry in the list on the Trust Center dialog box.
- In another file explorer window, enter "%APPDATA%" in the address bar without quotes
- An "Appdata Roaming" folder will be opened.
- Search and browse to BudgetLink folder. Copy the path to this folder.
- Navigate back to Trust Center Dialog box and click Add New Location button.
- Paste the copied text in the Path input box and select the Subfolders of this location are also trusted checkbox.
- Mark the Allow Trusted Locations on my network checkbox.
- Click on the Add new location... button.
- Click the Browse... button and select the folder where BudgetLink is installed.
- Select the Subfolders of this location are also trusted checkbox.
- Click OK to add the trusted location.
- Click on the OK button of the Trust Center dialogue.
- Click on the OK button of the Excel Options dialogue.
- Close Microsoft Excel.
Once the Trusted Location has been added you should be able to start BudgetLink. However, we do recommend you ensure no disabled items have been added. See Compile error due to disabled items for more information.
BudgetLink still doesn't work
If BudgetLink still doesn't start, please re-install BudgetLink
- Navigate to this link to download BudgetLink Installer
- To eliminate external issues, install Budgetlink from scratch on the Local C:\ Drive.
- If your current version is installed in C:\ Drive, rename the folder before installing to avoid conflict with the new installation.
- After installation, Allow Trusted Location to be automatically added.
- Enable and Install BudgetLink Ribbon


