Difference between revisions of "How to change the numbers of financial years available in ODBClink"
Jump to navigation
Jump to search
| Line 11: | Line 11: | ||
# From the ODBClink main menu, click on '''30. Settings'''; | # From the ODBClink main menu, click on '''30. Settings'''; | ||
# Click on '''Options | # Click on '''Options'''; | ||
# Click on the '''Set User Options''' button; | # Click on the '''Set User Options''' button; | ||
# From the options dialogue, select the '''Years''' item in the left-hand list; | # From the options dialogue, select the '''Years''' item in the left-hand list; | ||
Revision as of 21:15, 12 February 2017
Overview
OBClink Pro Edition can download data up to 10 financial years into the past and future but is usually configured to download data on 3 for performance reasons. These years are based on your current financial year in your accounting software.
Note: ODBClink Free Edition is fixed at 3 financial years.
How to change the numbers of financial years available in ODBClink
To change the number of financial years to download data, follow these steps.
- From the ODBClink main menu, click on 30. Settings;
- Click on Options;
- Click on the Set User Options button;
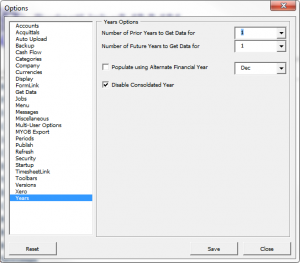
- From the options dialogue, select the Years item in the left-hand list;
- Change the Number of Prior Years to get data to the desired value;
- Change the Number of Future Years to get data to the desired value;
- Click on the Save button;
- Click on the Close button;
- Run a Get Data.
