Difference between revisions of "Complete the Setup Wizard"
Jump to navigation
Jump to search
| (13 intermediate revisions by the same user not shown) | |||
| Line 1: | Line 1: | ||
== Overview == | == Overview == | ||
After installing BudgetLink a Setup Wizard will commence. The purpose of the page is to guide you through how to Setup the Wizard. | |||
Follow the below self help instruction to complete the process. If you face any issue you can seek for '''Personal Support'''. For more information '''[http://accountingaddons.com.au/support/personal/ click here ]''' | Follow the below self help instruction to complete the process. If you face any issue you can seek for '''Personal Support'''. For more information '''[http://accountingaddons.com.au/support/personal/ click here ]''' | ||
| Line 7: | Line 7: | ||
==Installation == | ==Installation == | ||
At this stage you should have already installed BudgetLink. | |||
If you haven't done so follow the instructions for '''[[Installing BudgetLink]]''' and do so. | |||
== Setup Wizard == | == Setup Wizard == | ||
# | # Upon Installation BudgetLink should start up with macros running. If you see that the solution do not start refer to '''[[Troubleshooting Start-Up Problems]]''' page. | ||
#Once the macros run the solution will ask for '''[[Enabling Macros in Microsoft Excel]]'''. Then click yes; | |||
# If BudgetLink does not start after enabling macros then create a trusted location | #If BudgetLink does not start after enabling macros then create a trusted location; | ||
#The next step is Adding a Trusted Location will appear. Click on '''Yes''' to continue or for more information '''[[Adding a Trusted Location in Microsoft Excel | click here]]'''; | |||
# Click Yes for '''[[Adding a Trusted Location in Microsoft Excel]]''' | #We suggest clicking Yes to '''[[Create BudgetLink Shortcut]]'''; | ||
#Read the User License Agreement; | |||
# We suggest clicking Yes to '''[[Create BudgetLink Shortcut]]''' | #If OK click I accept the terms and conditions. | ||
# Read the User License Agreement; | |||
# If OK click I accept the terms and conditions. | |||
== Licensing BudgetLink == | == Licensing BudgetLink == | ||
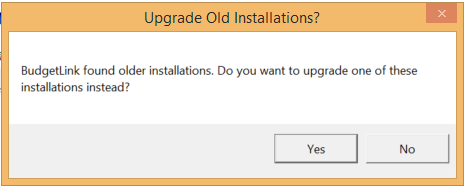
If you have an old version of BudgetLink on the same hard drive you will receive below pop out asking if this process is an upgrade; | |||
[[File:BudgetLink Popout.png]] | [[File:BudgetLink Popout.png]] | ||
* If yes, it is an upgrade. follow instruction on '''[[Upgrading BudgetLink]]''' | |||
* If yes, it is an upgrade. follow instruction on '''[[Upgrading BudgetLink]]''' | |||
* If a no , it is a new installation then you will see the BudgetLink Licensing screen. | * If a no , it is a new installation then you will see the BudgetLink Licensing screen. | ||
* Then follow the instruction on '''[[How to enter a License Key]]''' | |||
* Then follow the instruction on '''[[How to enter a License Key]]''' | |||
== Datafile Connectivity== | == Datafile Connectivity== | ||
Latest revision as of 21:36, 27 January 2016
Overview
After installing BudgetLink a Setup Wizard will commence. The purpose of the page is to guide you through how to Setup the Wizard.
Follow the below self help instruction to complete the process. If you face any issue you can seek for Personal Support. For more information click here
Installation
At this stage you should have already installed BudgetLink.
If you haven't done so follow the instructions for Installing BudgetLink and do so.
Setup Wizard
- Upon Installation BudgetLink should start up with macros running. If you see that the solution do not start refer to Troubleshooting Start-Up Problems page.
- Once the macros run the solution will ask for Enabling Macros in Microsoft Excel. Then click yes;
- If BudgetLink does not start after enabling macros then create a trusted location;
- The next step is Adding a Trusted Location will appear. Click on Yes to continue or for more information click here;
- We suggest clicking Yes to Create BudgetLink Shortcut;
- Read the User License Agreement;
- If OK click I accept the terms and conditions.
Licensing BudgetLink
If you have an old version of BudgetLink on the same hard drive you will receive below pop out asking if this process is an upgrade;
- If yes, it is an upgrade. follow instruction on Upgrading BudgetLink
- If a no , it is a new installation then you will see the BudgetLink Licensing screen.
- Then follow the instruction on How to enter a License Key
Datafile Connectivity
- Once the BudgetLink is installed you will need to connect the company datafile with the solution.
- Please follow the below instructions for How to connect BudgetLink to your datafile.
Get Data process
The Get Data process is the main process that transfers the data from your accounting packages into BudgetLink.
For more instructions on how to perform Get Data process, click here
