Creating the file to process credit card payments
Overview
DirectDebitsLink allows you to create the file required by your webportal to process credit card payments. Note that this file varies by institution.
Before creating this file, you will need to ensure that MYOB and DirectDebitsLink are both setup correctly. See Setting up MYOB AccountRight Live to process credit card payments, Setting up MYOB AccountRight 19 to process credit card payments and Setting up DirectDebitsLink to process credit card payments for more information.
Creating the file to process credit card payments using DirectDebitsLink
To create the file using DirectDebitsLink, follow these steps.
- From the Menu, select 12. Process Credit Cards, then Process Credit Cards;
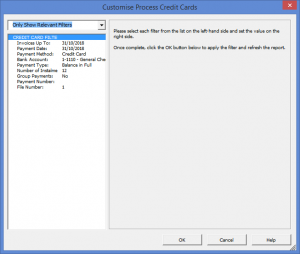
- Click on the Customise button;
- When prompted to run a Get Data, click OK if required;
- Enter the Invoices up to date which restricts future invoices from showing on the screen;
- Enter the Payment Date the payment is to be processed;
- Select the Payment Method for which to process;
- Select the Account into which the money will be deposited;
- Select the Payment Type which dictates whether invoices are paid in full or in installments;
- Enter the No. of Installments if applicable.
- Determine whether to Group Payments together when they belong to the same customer;
- Enter a Payment Number applicable to all payments if required;
- Enter a File Number if processing multiple files on the same day, otherwise set it to 1;
- Click OK to close the customize dialogue. The invoices to pay will appear;
- Select the invoices or click All or None button if required;
- Edit the Payment Number and Payment Amount if required;
- Click Create Bank File button and save your file somewhere on your machine;
- Navigate to your merchant facility's web portal and upload the file.
Notes
- The payment method controls the statement references that will be included in the file.
Selecting Invoices
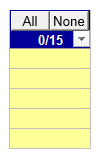
When selecting invoices, you have the option of double clicking in the first yellow column to tick the invoices to include.
Alternatively, you can also use the All or None button to select or unselect all invoices.
The number of invoices selected appear below the buttons.


