Connecting ExcelReportLink to Xero
Jump to navigation
Jump to search
Overview
You can connect ExcelReportLink to your Xero data file.
Connecting ExcelReportLink to Xero
To connect ExcelReportLink with Xero, follow these steps.
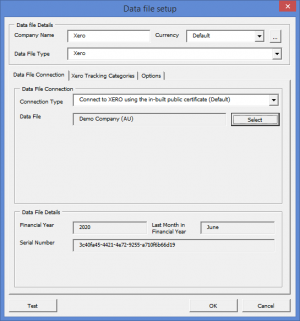
- Go to the Data File Setup dialogue;
- See Changing how ExcelReportLink connects to your data file for more information.
- Enter Company Name;
- Set the Data File Type to Xero';
- Set the Connection Type to Connect to Xero (default);
- Click Select button;
- When prompted, click the Authorise button and login to the Xero website to choose your data file;
- Once done, return to BudgetLink and click Confirm then OK once the dialogue says that authorisation was successful;
- Select your data file from the next dialogue;
- When prompted, choose to test the data file connection;
- Click on the Tracking Categories tab;
- Click Refresh Lists to pull the list of possible tracking categories;
- Select tracking category used for Jobs (if required);
- Select tracking category used for Categories (if required);
- Click OK to close the Data File Setup dialogue;
- Click Close to close the Manage Data Files dialogue;
- Run your first Get Data.
Notes
- When Connecting to Xero using the in-built public certificate, the Xero data file is chosen during the Get Data process due to security requirements of the Xero accounting product.
Connecting ExcelReportLink to Xero using a private certificate
Alternatively, you can connect ExcelReportLink to Xero using a private certificate. This approach, while technical to configure, bypasses the need to select the data file and obtain a verification code during each Get Data. For more information, see Connecting ExcelReportLink to Xero using a private certificate.
