Difference between revisions of "Archiving"
Jump to navigation
Jump to search
(Created page with "==Overview== Archiving in Sales Pivot solution is only available for MYOB Classic(v19) users. ==Procedure== You can either setup during uploading the data file or any time ...") |
|||
| (13 intermediate revisions by 2 users not shown) | |||
| Line 1: | Line 1: | ||
==Overview== | ==Overview== | ||
Archiving | Archiving brings two benefits: | ||
# Reduces the [[Get Data]] time. | |||
# Accumulates data across historical data files even when transactions are purged. | |||
It works by: | |||
* Keeping historical transactions. | |||
* And only extracts changed or recent records | |||
==How to setup Arhiving== | |||
[[File:Archiving.png|300px|thumb|right|Archiving]] | |||
# From the menu go to 30.Settings > Data Files. | |||
# Click the Manage Data Files button. | |||
# Select the data file to archive | |||
# Click the Edit Data File button. | |||
# Select the Options tab | |||
# In the data file setup dialogue to the bottom of the window. | |||
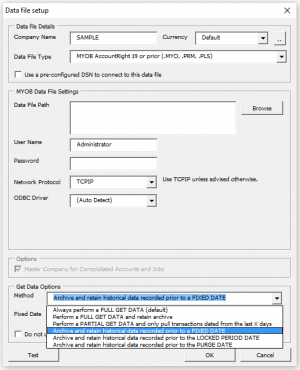
* Under Get Data Options click the dropdown. You will see the below options. | |||
<br clear=all /> | |||
[[File:Fixed Date Archiving.png|300px|thumb|right|Fixed Date Archiving]] | |||
1.'''Archive and retain historical data recorded prior to a FIXED DATE.''' | |||
With this option you will be able to select the date to archive the | |||
<br clear=all /> | |||
2.'''Archive and retain historical data recorded prior to the LOCKED PERIOD DATE.''' | |||
<br clear=all /> | |||
3.'''Archive and retain historical data recorded prior to the PURGE DATE.''' | |||
* Select the option you will require and click OK. | * Select the option you will require and click OK. | ||
Done. | Done. | ||
<br clear=all /> | |||
==Related Topics== | |||
[[How to Delete an Archive]] | |||
Latest revision as of 02:42, 17 April 2019
Overview
Archiving brings two benefits:
- Reduces the Get Data time.
- Accumulates data across historical data files even when transactions are purged.
It works by:
- Keeping historical transactions.
- And only extracts changed or recent records
How to setup Arhiving
- From the menu go to 30.Settings > Data Files.
- Click the Manage Data Files button.
- Select the data file to archive
- Click the Edit Data File button.
- Select the Options tab
- In the data file setup dialogue to the bottom of the window.
- Under Get Data Options click the dropdown. You will see the below options.
1.Archive and retain historical data recorded prior to a FIXED DATE.
With this option you will be able to select the date to archive the
2.Archive and retain historical data recorded prior to the LOCKED PERIOD DATE.
3.Archive and retain historical data recorded prior to the PURGE DATE.
- Select the option you will require and click OK.
Done.

