Difference between revisions of "Installing BudgetLink"
Jump to navigation
Jump to search
| Line 9: | Line 9: | ||
# At the Unzip to folder: [[Choose the folder to install BudgetLink]]; | # At the Unzip to folder: [[Choose the folder to install BudgetLink]]; | ||
# Click Unzip. An unzipped successfully message should appear when done; | # Click Unzip. An unzipped successfully message should appear when done; | ||
# Click OK. BudgetLink will open | # Click OK. BudgetLink will open. You may need to enable macros in order for BudgetLink to start fully; | ||
# Click Yes to [[Create BudgetLink Shortcut|Create a BudgetLink Shortcut]]. The [[Welcome to BudgetLink Form]] will display; | |||
# Click | |||
# Click [[Getting Started Guide]] and follow the instructions to complete the installation. | # Click [[Getting Started Guide]] and follow the instructions to complete the installation. | ||
Revision as of 18:46, 25 November 2013
Overview
Steps
- Download BudgetLink
- To start the BudgetLink Installer click Install_BudgetLink.exe. It may be located at the bottom of your Browser;
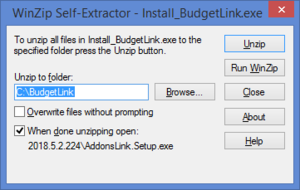
- Choose Run. The Winzip Self Extractor - Install_BudgetLink.exe form will appear;
- At the Unzip to folder: Choose the folder to install BudgetLink;
- Click Unzip. An unzipped successfully message should appear when done;
- Click OK. BudgetLink will open. You may need to enable macros in order for BudgetLink to start fully;
- Click Yes to Create a BudgetLink Shortcut. The Welcome to BudgetLink Form will display;
- Click Getting Started Guide and follow the instructions to complete the installation.
