Category Archives: FAQ

How to connect BudgetLink to MYOB AccountEdge (Mac Users)

BudgetLink integrates with MYOB AccountEdge.

MYOB AccountEdge does not have an ODBC Driver or API. As such the only way we can extract data from its data file is from export files and reports.

They way we do it is by first creating a folder where certain MYOB AccountEdge files are saved. BudgetLink then connects to these files and then transforms the data in them into the Standard BudgetLink format.

Check out this video to watch it in action.

Go to BudgetLink

How to add a custom report to BudgetLink

Background

BudgetLink reports are Excel workbooks with formulas and some buttons
All Workbooks saved into the BudgetLink\System folder will appear in the BudgetLink menu
If you have been sent a BudgetLink report please follow the instructions below add it

  1. Start BudgetLink and answer all the prompts until the get data has run and the screen is waiting for you to choose a report.
  2. In the menu, Go to the 35. Help entry
  3. In the menu, Click on the Links entry
  4. Click on the link next to the system folder. It will open up windows explorer.
  5. Download the file attached to the email into that folder.
  6. Extract the contents of the zip file into the system folder
  7. Delete the zip file afterwards.
  8. Go back to the menu, The new reports/s should appear

How to Register BudgetLink

If you have chosen to subscribe to the Ultimate Edition the first step is to Purchase a BudgetLink Monthly Subscription.

Once the purchase has been completed the next step is to register BudgetLink. To do so please follow the steps below

If BudgetLink is closed:

Start BudgetLink

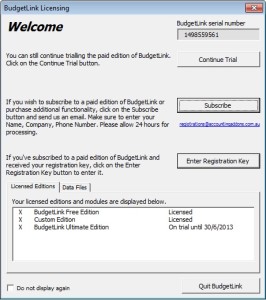
The BudgetLink Licensing form will appear

BudgetLink Licensing

Click Subscribe

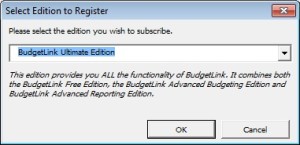
Select Edition To Register

Choose the Edition to subscribe to and click OK

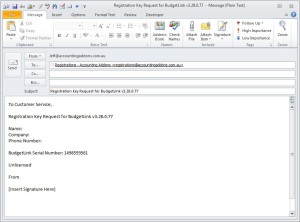
An email form will appear as below

Request Registration Email

Complete the email form fields and click Send

Please allow up to 2 hours turn around during business hours for a response.

How to set-up Reckon Accounts (Quickbooks) for integration with BudgetLink

You will need to ensure the list of accounts and classes are unique.

For classes, simply ensure the names are unique at all levels. Quickbooks allow things like CLASS 1 as a header, followed by CLASS 1 as a detail of CLASS 1. Although it names it internal as CLASS 1:CLASS 1, our product has issues with situations like this.

The same applies with accounts. With accounts, they may or may not use Account Numbers. Account Numbers have to be unique, so if they use those, great. If they do not use account numbers, then the account names MUST be unique. I’ll use Interest as an example. You could have a structure that looks similar to this…

INCOME
……….INTEREST
EXPENSES
……….INTEREST

While the internal names of the two interest accounts are INCOME:INTEREST and EXPENSES:INTEREST. Quickbooks does not provide us that detail and instead passes only the word INTEREST to us when giving us values. Hence we cannot determine which of the two interest accounts it relates to, same issue as with classes, but easier to understand this way). Again, the individual names must be unique on the whole structure.

To remedy, simply rename the accounts to be …

INCOME
……….INTEREST RECEIVED
EXPENSES
……….INTEREST PAID

Newer versions of BudgetLink (which you have) will detect and warn when those problems arise, but it is easier to remedy before hand as you won’t be wasting your time cleaning up their classes or accounts during the setup.

How to configure the Ratio’s report

Some customisation must be done on the report to configure it correctly as each MYOB chart of accounts is unique. To configure the ratios, follow these steps.

1) Open the ratios report and customise it.
2) Notice the “Addins” tab in the excel ribbon. Click on it.
3) Notice the Green Plus and Red Minus in the Addins Ribbon. Click the Green Plus to show all the hidden rows.
4) Enter your account numbers to represent your various assets, etc., in the cells in yellow.
5) Once done. Click on the Red Minus to hide these cells.
6) Click on the customise to check the numbers.
7) If everything looks good, you will need to save the changes in the workbook. Click Save (standard excel save) and click the UPDATE button when prompted. Wait a bit, and next time you open the report up, it should have remembered your accounts.