Difference between revisions of "Installing DirectDebitsLink"
Jump to navigation
Jump to search
| Line 14: | Line 14: | ||
# Once macros are enabled, you will be prompted to [[Create DirectDebitsLink Shortcut|create a DirectDebitsLink shortcut]]. Click Yes to do so; | # Once macros are enabled, you will be prompted to [[Create DirectDebitsLink Shortcut|create a DirectDebitsLink shortcut]]. Click Yes to do so; | ||
# The '''Welcome to DirectDebitsLink''' dialogue will display; | # The '''Welcome to DirectDebitsLink''' dialogue will display; | ||
# | # Once you've read the User License Agreement, tick the '''I Accept...''' checkbox and click '''New Installation''' or '''Upgrade''' button; | ||
== Related Topics == | == Related Topics == | ||
Revision as of 01:05, 30 May 2014
Prior to installing DirectDebitsLink, you will need to download it. To do so, refer to the Downloading DirectDebitsLink article.
Once downloaded, follow these steps to install DirectDebitsLink.
- To start the DirectDebitsLink Installer click Install_DirectDebitsLink.exe. It may be located at the bottom of your Browser;
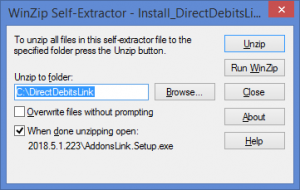
- Choose Run. The Winzip Self Extractor - Install_DirectDebitsLink.exe form will appear;
- At the Unzip to folder: Choose the folder to install DirectDebitsLink;
- Click Unzip. An unzipped successfully message should appear when done;
- Click OK. DirectDebitsLink should now start;
- When you start DirectDebitsLink for the first time, you may need to enable macros in order for DirectDebitsLink to start fully;
- DirectDebitsLink will open in a new session in Excel and the Menu will appear.
- Once macros are enabled, you will be prompted to create a DirectDebitsLink shortcut. Click Yes to do so;
- The Welcome to DirectDebitsLink dialogue will display;
- Once you've read the User License Agreement, tick the I Accept... checkbox and click New Installation or Upgrade button;
