How to enable weekly reporting periods
Jump to navigation
Jump to search
Overview
BudgetLink allows you to report Profit and Loss and Balance Sheet data on a weekly basis. It will also allow you to capture Budgets on a weekly basis.
Note that BudgetLink Free Edition does not have this feature. You will need to Upgrade to BudgetLink Ultimate Edition to be able to configure this setting.
How to enable weekly reporting in BudgetLink
To enable weekly reporting in BudgetLink, follow these steps.
- From the BudgetLink main menu, click on 30. Settings;
- Click on Options;
- Click on the Set User Options button;
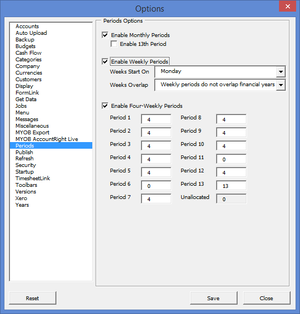
- From the options dialogue, select the Periods item in the left-hand list;
- Tick the Enable Weekly Periods option;
- When prompted, click Yes to enable the Accruals (Weekly) version;
- Choose which day the weeks start on;
- Choose whether Weekly periods do not overlap financial years, The Start Date determines the financial year or The End Date determines the financial year;
- If using Four-Weekly Periods, tick the Enable Four-Weekly Periods;
- If using Four-Weekly Periods, also enter the number of weeks for each period. Ensure all 53 weeks are allocated.
- Click Save to save the changes.
Notes
- When using Four Weekly Periods, a total of 53 weeks need to be allocated to account for partial weeks.
- When using Four Weekly Periods, a 13th period may get created if required.
- When using Four Weekly Periods, the traditional Monthly Periods will no longer apply and be available.
How to enable Accurals (Weekly) version in BudgetLink
To enable weekly reporting in BudgetLink, you will also need to enable the Accruals (Weekly) version. To do so, follow these steps.
- From the BudgetLink main menu, click on 30. Settings;
- Click on Options;
- Click on the Set User Options button;
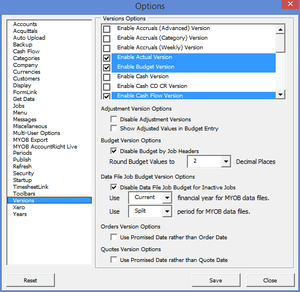
- From the options dialogue, select the Versions item in the left-hand list;
- Tick the Enable Accruals (Weekly) version;
- Click Save to save the changes.

